Battles of January 28 including descriptions of the battles, geographic locations, associated artwork, and museums where a person can find associated artifacts and artwork.
Songs of the day:
Morgan’s Way to Panama variation 1 (Sea Shanty English point of view)
Morgan’s Way to Panama variation 2 (Sea Shanty English point of view)
Panama’s Golden Cup variation 1 (Spanish Baroque Spanish point of view)
Panama’s Golden Cup variation 2 (Spanish Baroque Spanish point of view)
1. Battle of Aliwal
Date: January 28, 1846
War: First Anglo-Sikh War
Cause: The battle was triggered by the Sikh army, led by Ranjodh Singh Majithia, crossing the Sutlej River into British-held territory to cut off British supply lines. The British forces, under Sir Harry Smith, moved to intercept them.
Result: A decisive British victory. The British charge broke the Sikh infantry squares, leading to a rout across the river and the capture of the Sikh camp and artillery. This victory was a turning point in the war.
Paintings & Art
- Painting: Charge of the 16th (Queen’s Own) Lancers at the Battle of Aliwal, 28 January 1846
- Artist: Henry Martens (engraved by J. Harris)
- Year: c. 1847
Museums & Artifacts
- National Army Museum (London, United Kingdom): Holds the original watercolors and aquatints by Henry Martens and Michael Angelo Hayes depicting the battle, as well as uniforms and weaponry from the 16th Lancers.
- The Queen’s Royal Lancers and Nottinghamshire Yeomanry Museum (Nottinghamshire, United Kingdom): Houses specific artifacts related to the 16th Lancers’ famous charge at this battle.
Location
- General: Aliwal, Ludhiana District, Punjab, India.
- Coordinates: 30°56′38″N 75°37′16″E
Recommended Book
- The First Anglo-Sikh War by Amarpal Singh.
- Imagined Painting
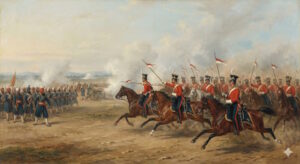
Above: A painting in the style of Henry Martens depicting the decisive charge of the 16th Lancers against Sikh infantry at the Battle of Aliwal.
2. The January 28 Incident (First Battle of Shanghai)
Date: January 28, 1932
War: Undeclared Sino-Japanese War (Interwar Period)
Cause: Tensions boiled over after a staged incident where Japanese monks were beaten in Shanghai. Using this as a pretext, Japanese marines launched an attack on the Zhabei district of Shanghai to expand their control and suppress Chinese anti-Japanese boycotts.
Result: A military standoff that lasted over a month. While the Japanese eventually captured positions after heavy reinforcement, the fierce Chinese resistance forced a negotiated demilitarization of Shanghai rather than a total occupation at that time.
Paintings & Art
- Painting/Print: Japan Invasion: January 28 or Shanghai Incident (Political Cartoon/Lithograph)
- Artist: Bernard Partridge (for Punch Magazine)
- Year: 1932
Museums & Artifacts
- Shanghai Songhu Memorial Hall for the Anti-Japanese War (Shanghai, China): A massive museum located at the site of the battle, dedicated entirely to the 1932 and 1937 battles of Shanghai, featuring excavated weapons, uniforms, and extensive photographic archives.
- National Museum of China (Beijing, China): Contains documents and artifacts relating to the 19th Route Army which defended the city.
Location
- General: Zhabei District (now Jing’an District), Shanghai, China.
- Coordinates: 31°15′00″N 121°27′00″E
Recommended Book
- Shanghai 1932: The First Sino-Japanese War by Donald A. Jordan.
Imagined painting
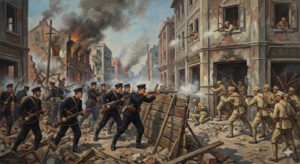
Above: A social realist painting from the 1930s depicting intense street fighting between Japanese marines and Chinese soldiers in the Zhabei district during the January 28 Incident.
3. Action of 28 January 1945
Date: January 28, 1945
War: World War II
Cause: A Royal Navy squadron comprising the cruisers HMS Diadem and HMS Mauritius intercepted a German destroyer flotilla attempting to move from Norway to the Baltic Sea to support the defense of the German homeland. Result: A strategic British success. One German destroyer was heavily damaged and the flotilla was forced to return to port, delaying their redeployment and exposing them to further air attacks, although no ships were sunk during the engagement itself.
Paintings & Art
- Painting: HMS Diadem (Naval portrait often associated with her late-war service)
- Artist: Generic naval photography and draftsmanship from the Admiralty
- Year: c. 1944–1945
Museums & Artifacts
- Imperial War Museum (London, United Kingdom): Houses logs, reports, and photographic records of HMS Diadem and the Home Fleet’s actions off Norway.
- Royal Naval Museum (Portsmouth, United Kingdom): Contains general artifacts related to the Dido-class and Fiji-class cruisers involved in the battle.
Location
- General: North Sea, approximately 35 miles northwest of Bergen, Norway.
- Coordinates: 60°48′00″N 4°30′00″E
Recommended Book
- German Destroyers of World War II by Gerhard Koop and Klaus-Peter Schmolke.
- Imagined Painting
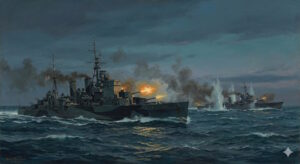
- Above: A mid-20th-century marine painting in the style of Norman Wilkinson, showing British cruisers engaging German destroyers in the Action of 28 January 1945.
4. Seizure of Helsinki (Start of Finnish Civil War)
Date: January 28, 1918
War: Finnish Civil War
Cause: Following growing class tensions and the collapse of the Russian Empire, the Red Guards (socialist paramilitary) mobilized to seize control of the capital, Helsinki, from the conservative Senate.
Result: The Red Guards successfully took control of Helsinki on January 28, forcing the Senate to flee to Vaasa. This event effectively marked the outbreak of full-scale civil war in Finland.
Paintings & Art
- Painting: Red Guards on the March (Representative of the era/subject)
- Artist: Various contemporary artists (e.g., works by Jalmari Ruokokoski depicting the Red side, though often later)
- Year: c. 1918
Museums & Artifacts
- Military Museum of Finland (Helsinki, Finland): Features a dedicated exhibition on the Civil War, including uniforms of both the Red and White Guards and weaponry used during the seizure of the capital.
- The Lenin Museum (Tampere, Finland): Holds artifacts and history regarding the socialist movement and the revolution that sparked the war.
Location
- General: Helsinki, Finland (Senate Square and Government Palace).
- Coordinates: 60°10′10″N 24°57′09″E
Recommended Book
- The Finnish Civil War 1918: History, Memory, Legacy by Tuomas Tepora.
- Imagined Painting
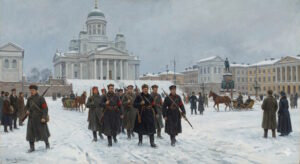
- Above: A 1918 painting in a Nordic realist style, showing Red Guards marching in Helsinki’s Senate Square during their seizure of the capital.
5. Battle of Mata Asnillos (Sack of Panama)
Date: January 28, 1671 (Old Style / Julian Calendar)
War: Anglo-Spanish Privateer Wars (Unofficial)
Cause: The famous privateer Henry Morgan led a massive expedition of buccaneers across the Isthmus of Panama. His goal was to capture Panama City (Panama Viejo), which was the richest city in the Spanish New World and the transit point for Peruvian silver. The Spanish governor, Don Juan Pérez de Guzmán, deployed his forces on the plains of Mata Asnillos outside the city to stop the pirates.
Result: Privateer/English Victory. Morgan’s forces used superior tactics to shatter the Spanish cavalry and infantry. The Spanish attempt to use a herd of oxen to stampede the pirates failed. Following the battle, Panama City was looted and burned to the ground (either by the Spanish to deny it to Morgan, or by the pirates), leading to the abandonment of the site and the founding of the modern Panama City (Casco Viejo) nearby.
Paintings & Art
- Painting: The Sack of Panama (Illustration)
- Artist: Howard Pyle
- Year: c. 1900
- Engraving: Battle of Mata Asnillos (Featured in The Buccaneers of America)
- Artist: Jan Luyken (attributed)
- Year: 1678
- Painting: Morgan at Panama
- Artist: Unknown (19th-century engraving)
- Year: c. 1850
Museums & Artifacts
- Patronato Panamá Viejo (Panama City, Panama): An open-air archaeological museum preserving the ruins of the original city destroyed after the battle. It contains weapons, ceramics, and items recovered from the ashes.
- National Maritime Museum (Greenwich, United Kingdom): Houses maps and navigational instruments from the era of privateers and Henry Morgan.
Location
- General: Panama Viejo, Panama City, Panama
- Coordinates: 9.0075° N, 79.4850° W
Recommended Book
- Empire of Blue Water: Captain Morgan’s Great Pirate Army, the Epic Battle for the Americas, and the Catastrophe That Ended the Outlaws’ Bloody Reign by Stephan Talty.
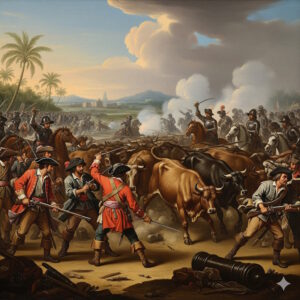
- Imagined Painting
-
The Visualized Moment: The Failure of the Spanish Oxen Charge
This painting depicts the decisive and most famous tactical moment of the battle on the plains outside Panama City. The Spanish defenders, outmatched by Henry Morgan’s battle-hardened privateers, attempted a desperate stratagem: they drove a massive herd of oxen and bulls toward the pirate lines, hoping the stampede would break their ranks and allow the Spanish cavalry to cut them down.
The image captures the moment this tactic spectacularly backfired. Morgan’s sharpshooters fired volleys into the approaching herd. The noise and pain caused the animals to panic, turn aside, and stampede directly into the Spanish right wing, causing chaos among their own horsemen.
Explanation of Pictorial Elements
- The Stampeding Herd (Center): The bulls are the central focus of the action. They are shown mid-stampede, kicking up dust and creating a physical barrier between the two forces. Their direction—pushing toward the right side of the frame—visually represents them turning against their Spanish handlers.
- Henry Morgan’s Privateers (Left Foreground):
- Uniforms/Attire: They are dressed not in standardized military uniforms, but in the practical, motley attire of buccaneers of the era: loose trousers, rough shirts, waistcoats, and various headwear like bandanas and slouch hats. The prominent red coats worn by some figures represent common imported clothing of the time, often adopted by privateer leaders to denote status.
- Action: They are shown holding their ground, firing muskets at the herd or preparing for close-quarters combat with cutlasses, representing the discipline Morgan managed to instill in his irregular force.
- Spanish Cavalry (Right & Midground):
- Attire: The Spanish forces are depicted with more formal military gear typical of European colonial garrisons, including metal breastplates, helmets (resembling late-era morions or burgonets), and high leather boots.
- Action: They are shown in disarray. The horsemen on the right are struggling to control their mounts amid the stampeding bulls, illustrating the confusion that led to their defeat.
- Background Elements:
- Panama Viejo (Distance): In the far background, the walled city of Panama Viejo is visible. This establishes the high stakes of the battle—the richest city in the Spanish Main. The prominent tower hints at the cathedral tower that still stands as a ruin today.
- Geography: The flat, dusty terrain represents the savanna of Mata Asnillos where the battle took place. Palm trees are included to emphasize the tropical location on the Isthmus of Panama.
- Artistic Style: The painting emulates the Baroque battle painting style prevalent in the late 17th century. It uses dramatic lighting (chiaroscuro) to highlight the central action, thick smoke to convey the “fog of war,” and a somewhat stylized, theatrical composition meant to glorify the chaotic spectacle of the engagement.
Books for sale
Contact Information
For more “Military History Inside Out” please follow me at www.warscholar.org, on Facebook at warscholar, on twitter at Warscholar, on youtube at warscholar1945 and on Instagram @crisalvarezswarscholar. Or subscribe to the podcast on Apple Podcasts | Google Podcasts | Stitcher | Spotify
Tags: military museum, military artwork, battles, Military History, War History, Battle Art, War Paintings, War Art, Military Art, Museum Visit, Art History, Historical Artifacts, Museum Collection, Battlefield Tours, History Museum, Museum Life, History In Art, Historic Preservation, January 28, On This Day, History, Military History, War History, Historical Events, History Buff, World History, Battle Of Aliwal, Sikh Wars, Shanghai Incident 1932, 19th Route Army, WWII, Naval History, Royal Navy, Finnish Civil War, Helsinki 1918, Henry Morgan, Pirate History, Panama Viejo, National Army Museum, Imperial War Museum, Shanghai History
As an Amazon Associate I earn from qualifying purchases.